1. ¿Que es Firebase?
Firebase es la plataforma en la nube de Google. Dispone de diferentes servicios como login, base de datos, hosting … y el más conocido que son las notificaciones push. En este post nos vamos a centrar en el servicio de login y base de datos y como utilizarlo con una aplicación en Xamarin.Forms (Android e iOS).
- ¿Por qué Firebase?
Normalmente cuando se desarrolla una APP necesitamos un desarrollo pararelo de una API para la autenticación del usuario y obtener/modificar los datos que están en una BBDD. Utilizando Firebase podemos eliminar ese desarrollo de la API y utilizar los servicios que nos ofrece, por lo que el coste del desarrollo total de la APP es menor en dinero y en tiempo.
En este post vamos a ver como crear una APP con login y una vez dentro una lista de tareas en la que podermos añadir y eliminar.
- Configuración de Firebase
Para configurar Firebase lo primero es ir a la consola de desarrollador de Firebase, accediendo a https://firebase.google.com, y crear un proyecto.

A continuación, hay que crear la aplicación Android, introduciendo el nombre del paquete. El certificado de firma de depuración SHA-1 es opcional, pero es recomendable crear uno y añadirlo. El segundo paso es descargar el archivo goolge-service.json, que se utilizará más adelante.

Igual que hemos creado el paso anterior creamos la aplicación iOS, pero en este caso el fichero que debemos descargar es GoogleService-Info.plist. Si perdemos estos ficheros podemos volver a descargarlos accediendo a la configuración del proyecto Firebase.
Accedemos a la pestaña de Authentication de nuestro proyecto para ver todos los métodos de autenticación que tenemos y habilitamos Google.

En la pestaña de Database creamos una nueva base de datos para nuestro proyecto. Seleccionamos “Realtime Database” y podemos ver la url que usaremos para acceder a nuestra BBDD.
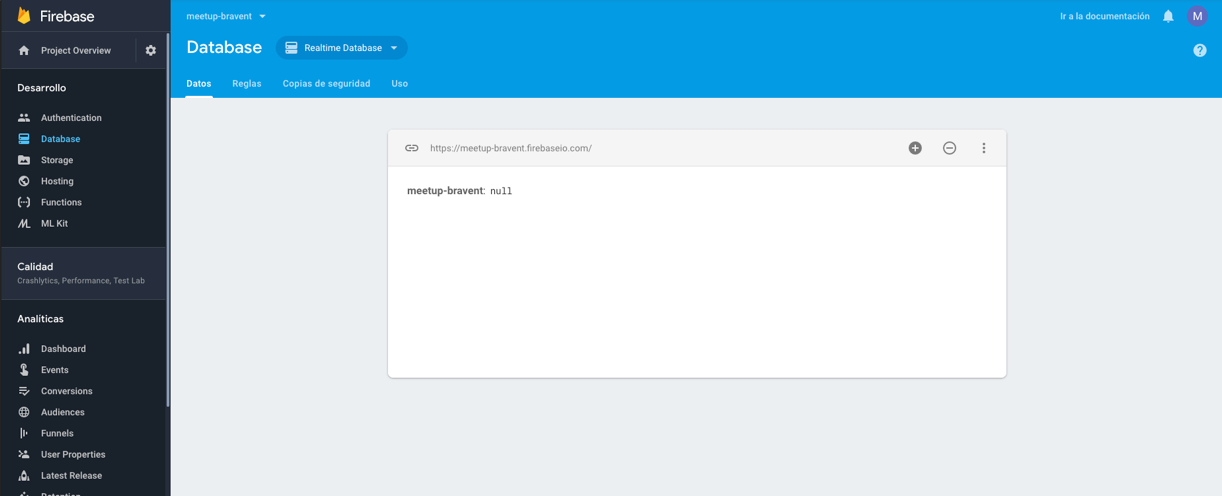
Con esto ya tenemos configurado Firebase.
- Configuración para Android (Xamarin.Forms)
Lo primero es añadir lo paquetes Nugets. Primero agregamos Google Play Services al proyecto haciendo click derecho sobre la carpeta de paquetes del proyecto, y seleccionamos añadir servicio de Google Play Services. Nos abre una ventana en la que seleccionamos Firebase–Auth y aceptamos. También hay que añadir los paquetes Xamarin.GooglePlayServices.Auth y Xamarin.Firebase.Database .
Lo siguiente es añadir el archivo Google-Services.json, que descargamos antes. Una vez agregado le damos botón derecho y en acción de compilación seleccionamos GoogleServicesJson.
Por último, inicializamos Firebase en la App añadiendo las siguientes líneas en el método OnCreate del MainActivity:
var options = new FirebaseOptions.Builder() .SetApplicationId({ID de aplicación}) .SetApiKey({Clave de API de la web}) .SetDatabaseUrl({URL Realtime Database}) .Build();
if (app == null) app = FirebaseApp.InitializeApp(this, options, {Nombre del proyecto});
Los datos “ID de la aplicación” y “Clave de API de la web” los obtenemos de la configuración del proyecto Android de Firebase, y “URL Realtime Database” de la BBDD de Firebase.
- Configuración para iOS (Xamarin.Forms)
Igual que en Android lo primero es añadir los paquetes necesarios, que para iOS son: Xamarin.Firebase.iOs.Auth, Xamarin.Auth y Xamarin.Firebase.iOS.Database.
También tenemos que añadir el archivo descargado desde Firebase, pero en este caso GoogleService-Info.plist, y le cambiamos la acción de compilación a BundleResource.
En el fichero Entitlements.plist hay que habilitar cadena de claves para poder guardar credenciales en nuestra aplicación iOS.

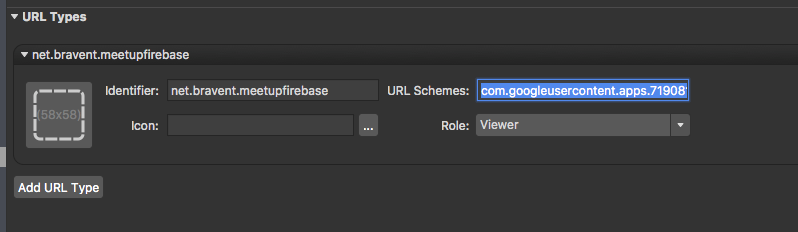
En el fichero Info.plist tenemos que añadir una entrada para la autenticación de Google, introduciendo el identificador de la aplicación y el valor REVERSED_CLIENT_ID del fichero GoogleService-Info.plist.
Ya solo queda en las opciones de compilación de iOS añadir –registrar:static en el campo Argumentos mtouch adicionales.
Igual que en Android inicializamos Firebase en el proyecto de iOS. En este caso añadimos la siguiente línea en el método FinishedLaunching del AppDelegate:
Firebase.Core.App.Configure();
- Autenticación con Firebase
Para la autenticación de nuestra App creamos una interfaz con los métodos necesarios, que será utilizada en el ViewModel.
    public interface IFirebaseAuthService
    {
        String getAuthKey();
        bool IsUserSigned();
        Task SignUp(String email, String password);
        Task SignIn(String email, String password);
        void SignInWithGoogle();
        Task SignInWithGoogle(String token);
        Task Logout();
        String GetUserId();
    }
Una vez tenemos la interfaz hay que implementarla en cada plataforma. También hay que configurar cada plataforma para que funcione el login con Google.
Android:
La implementación de la intefaz es:
[expand title=»VER CÓDIGO»]
public class FirebaseAuthService : IFirebaseAuthService
{
public static int REQ_AUTH = 9999;
public static String KEY_AUTH = "auth";

public bool IsUserSigned()
{
var user = Firebase.Auth.FirebaseAuth

.GetInstance(MainActivity.app).CurrentUser;
var signedIn = user != null;
return signedIn;
}

public async Task SignUp(string email, string password)
{
try
{
await Firebase.Auth.FirebaseAuth.GetInstance(MainActivity.app)

.CreateUserWithEmailAndPasswordAsync(email, password);

return true;
}
catch (Exception)
{
return false;
}
}

public async Task SignIn(string email, string password)
{
try
{
await Firebase.Auth.FirebaseAuth.GetInstance(MainActivity.app)

.SignInWithEmailAndPasswordAsync(email, password);
return true;
}
catch (Exception)
{
return false;
}
}

public void SignInWithGoogle()
{
var google = new Intent(Forms.Context,typeof(GoogleLoginActivity));
((Activity)Forms.Context).StartActivityForResult(google, REQ_AUTH);
}        public async Task SignInWithGoogle(string token)
{
try
{
AuthCredential credential = GoogleAuthProvider.GetCredential

(token, null);
await Firebase.Auth.FirebaseAuth.GetInstance(MainActivity.app)

.SignInWithCredentialAsync(credential);
return true;
}
catch (Exception)
{
return false;
}
}

public async Task Logout()
{
try
{
Firebase.Auth.FirebaseAuth.GetInstance(MainActivity.app)

.SignOut();
return true;
}
catch (Exception)
{
return false;
}
}

public string getAuthKey()
{
return KEY_AUTH;
}

public string GetUserId()
{
var user = Firebase.Auth.FirebaseAuth.GetInstance

(MainActivity.app).CurrentUser;
return user.Uid;
}
}
[/expand]
Para la autenticación con Google hay que crear una nueva clase “GoogleLoginActivity”, que será la que muestre la pantalla donde interactuamos con Google.
[expand title=»VER CÓDIGO»]
[Activity(Label = "GoogleLogin", Theme = "@style/Theme.AppCompat.Light.DarkActionBar")]
public class GoogleLoginActivity : AppCompatActivity, GoogleApiClient.IConnectionCallbacks, GoogleApiClient.IOnConnectionFailedListener
{
const string TAG = "GoogleLoginActivity";

const int RC_SIGN_IN = 9001;

const string KEY_IS_RESOLVING = "is_resolving";
const string KEY_SHOULD_RESOLVE = "should_resolve";

static GoogleApiClient mGoogleApiClient;

bool mIsResolving = false;

bool mShouldResolve = false;

private static GoogleSignInAccount mAuth;
protected override void OnCreate(Bundle savedInstanceState)
{
base.OnCreate(savedInstanceState);

String token = {ID de cliente web}
GoogleSignInOptions gso = new GoogleSignInOptions.Builder(GoogleSignInOptions.DefaultSignIn)
.RequestIdToken(token)
.Build();

mGoogleApiClient = new GoogleApiClient.Builder(this)
.AddConnectionCallbacks(this)
.AddOnConnectionFailedListener(this)
.AddApi(Auth.GOOGLE_SIGN_IN_API, gso)
.Build();

Intent signInIntent = Auth.GoogleSignInApi.GetSignInIntent(mGoogleApiClient);
StartActivityForResult(signInIntent, RC_SIGN_IN);
}

private void HandleResult(GoogleSignInAccount result)
{
if (result != null)
{
Intent myIntent = new Intent(this, typeof(GoogleLoginActivity));
myIntent.PutExtra("result", result);
SetResult(Result.Ok, myIntent);
}
Finish();
}

private async void UpdateData(bool isSignedIn)
{
if (isSignedIn)
{
HandleResult(mAuth);
}
else
{
await System.Threading.Tasks.Task.Delay(2000);
mShouldResolve = true;
mGoogleApiClient.Connect();
}
}

protected override void OnStart()
{
base.OnStart();
mGoogleApiClient.Connect();
}

protected override void OnStop()
{
base.OnStop();
mGoogleApiClient.Disconnect();
}

protected override void OnSaveInstanceState(Bundle outState)
{
base.OnSaveInstanceState(outState);
outState.PutBoolean(KEY_IS_RESOLVING, mIsResolving);
outState.PutBoolean(KEY_SHOULD_RESOLVE, mIsResolving);
}

protected override void OnActivityResult(int requestCode, Result resultCode, Intent data)
{
base.OnActivityResult(requestCode, resultCode, data);

if (requestCode == RC_SIGN_IN)
{
var result = Android.Gms.Auth.Api.Auth.GoogleSignInApi.GetSignInResultFromIntent(data);
if (result.IsSuccess)
{
// Google Sign In was successful, authenticate with Firebase
HandleResult(result.SignInAccount);

}
else
{
// Google Sign In failed, update UI appropriately
HandleResult(null);
}
}
}

public void OnConnected(Bundle connectionHint)
{
UpdateData(false);
}

public void OnConnectionSuspended(int cause) { }

public void OnConnectionFailed(ConnectionResult result)
{
if (!mIsResolving && mShouldResolve)
{
if (result.HasResolution)
{
try
{
result.StartResolutionForResult(this, RC_SIGN_IN);
mIsResolving = true;
}
catch (IntentSender.SendIntentException e)
{
mIsResolving = false;
mGoogleApiClient.Connect();
}
}
else
{
ShowErrorDialog(result);
}
}
else
{
UpdateData(false);
}
}

class DialogInterfaceOnCancelListener : Java.Lang.Object, IDialogInterfaceOnCancelListener
{
public Action OnCancelImpl { get; set; }

public void OnCancel(IDialogInterface dialog)
{
OnCancelImpl(dialog);
}
}

void ShowErrorDialog(ConnectionResult connectionResult)
{
int errorCode = connectionResult.ErrorCode;

if (GoogleApiAvailability.Instance.IsUserResolvableError(errorCode))
{

var listener = new DialogInterfaceOnCancelListener();
listener.OnCancelImpl = (dialog) =>
{

mShouldResolve = false;
};
GoogleApiAvailability.Instance.GetErrorDialog(this, errorCode, RC_SIGN_IN, listener).Show();
}
else
{
mShouldResolve = false;
}
HandleResult(mAuth);
}
}
[/expand]
El campo “ID de cliente web” lo obtenemos de Firebase. En la pestaña Authentication seleccionamos Google y en “Configuración del SDK web” podemos verlo.
Para recoger el resultado de la Activity creada anteriormente hay que añadir el método OnActivityResult del MainActivity.
  protected override void OnActivityResult(int requestCode, Result resultCode, Intent data)
        {
            base.OnActivityResult(requestCode, resultCode, data);
            if (requestCode == FirebaseAuthService.REQ_AUTH && resultCode == Result.Ok)
            {
                GoogleSignInAccount sg = (GoogleSignInAccount)data.GetParcelableExtra("result");
                MessagingCenter.Send(FirebaseAuthService.KEY_AUTH, FirebaseAuthService.KEY_AUTH, sg.IdToken);
            }
        }
iOS:
La implementación de la interfaz es:
[expand title=»VER CÓDIGO»]
public class FirebaseAuthService : IFirebaseAuthService
{
public static String KEY_AUTH = "auth";
public static OAuth2Authenticator XAuth;
private static bool hasLoginResult = false;
private static bool loginResult = false;
private static bool signUpResult = false;
CancellationTokenSource tokenSource ;
CancellationToken token;
Task t;

public IntPtr Handle => throw new NotImplementedException();

public string getAuthKey()
{
return KEY_AUTH;
}

public bool IsUserSigned()
{
var user = Auth.DefaultInstance.CurrentUser;
return user != null;
}

public async Task Logout()
{
NSError error;
var signedOut = Auth.DefaultInstance.SignOut(out error);

if (!signedOut)
{
return false;
}

return true;
}

//LOGIN USER/PASS
public async Task SignIn(string email, string password)
{
Auth.DefaultInstance.SignIn(email, password, HandleAuthResultLoginHandler);
tokenSource = new CancellationTokenSource();
token = tokenSource.Token;
t = Task.Factory.StartNew(async () =>
{
await Task.Delay(4000);
}, token).Unwrap();
await t;

return loginResult;
}

private void HandleAuthResultLoginHandler(User user, Foundation.NSError error)
{
if (error != null)
{
loginResult = false;
hasLoginResult = true;
}
else
{
loginResult = true;
hasLoginResult = true;
}
tokenSource.Cancel();
}

//COMPROBAR TOKEN LOGIN GOOGLE
public async Task SignInWithGoogle(string tokenId)
{
String[] tokens = tokenId.Split(new string[] { "###" }, StringSplitOptions.None);
var credential = GoogleAuthProvider.GetCredential(tokens[0], tokens[1]);
Auth.DefaultInstance.SignIn(credential, HandleAuthResultHandlerGoogleSignin);
tokenSource = new CancellationTokenSource();
token = tokenSource.Token;
t = Task.Factory.StartNew(async () =>
{
await Task.Delay(4000);
}, token).Unwrap();
await t;

return loginResult;
}

private void HandleAuthResultHandlerGoogleSignin(User user, NSError error)
{
if (error != null)
{
loginResult = false;
hasLoginResult = true;
}
else
{
loginResult = true;
hasLoginResult = true;
}

tokenSource.Cancel();
}

// LOGIN GOOLE
public void SignInWithGoogle()
{
XAuth = new OAuth2Authenticator(
clientId: "{ClientId}",
clientSecret: "",
scope: "profile",
authorizeUrl: new Uri("https://accounts.google.com/o/oauth2/v2/auth"),
redirectUrl: new Uri("{RedirectUrl}"),
accessTokenUrl: new Uri("https://www.googleapis.com/oauth2/v4/token"),
isUsingNativeUI: true);

var window = UIApplication.SharedApplication.KeyWindow;
var vc = window.RootViewController;
XAuth.Completed += OnAuthenticationCompleted;

XAuth.Error += OnAuthenticationFailed;

var viewController = XAuth.GetUI();
vc.PresentViewController(viewController, true, null);
}

private void OnAuthenticationCompleted(object sender, AuthenticatorCompletedEventArgs e)
{
var window = UIApplication.SharedApplication.KeyWindow;
var vc = window.RootViewController;
vc.DismissViewController(true, null);

if (e.IsAuthenticated)
{
var access_token = e.Account.Properties["access_token"].ToString();
var id_token = e.Account.Properties["id_token"].ToString();

MessagingCenter.Send(FirebaseAuthService.KEY_AUTH, FirebaseAuthService.KEY_AUTH, id_token + "###" + access_token);
}
else
{
//Error
}
}

private void OnAuthenticationFailed(object sender, AuthenticatorErrorEventArgs e)
{
var window = UIApplication.SharedApplication.KeyWindow;
var vc = window.RootViewController;
vc.DismissViewController(true, null);
}

// REGISTRO USUARIO
public async Task SignUp(string email, string password)
{
Auth.DefaultInstance.CreateUser(email, password,HandleAuthResultHandlerSignUp);
tokenSource = new CancellationTokenSource();
token = tokenSource.Token;
t = Task.Factory.StartNew(async () =>
{
await Task.Delay(4000);
}, token).Unwrap();
await t;
return signUpResult;
}

private void HandleAuthResultHandlerSignUp(User user, Foundation.NSError error)
{
if (error != null)
{
signUpResult = false;
hasLoginResult = true;
}
else
{
signUpResult = true;
hasLoginResult = true;
}
tokenSource.Cancel();
}

public string GetUserId()
{
var user = Auth.DefaultInstance.CurrentUser;
return user.Uid;
}
}
[/expand]
El campo ClienteId lo obtenemos del fichero GoogleService-Info.plist, y el campo RedirectUrl es la unión del valor de REVERSE_CLIENT_ID del mismo fichero y a continuación se le añade “:/oauth2redirect”.
En Android se creó una Activity para el Login con Google, pero en iOS se utiliza una OAuth2Authenticator, que abre una ventana del navegador, para logarnos. Para obtener el resultado de la autenticación hay que añadir dos funciones al AppDelegate.
[expand title=»VER CÓDIGO»]
// For iOS 9 or newer
public override bool OpenUrl(UIApplication app, NSUrl url, NSDictionary options)
{
Uri uri_netfx = new Uri(url.AbsoluteString);

// load redirect_url Page for parsing
FirebaseAuthService.XAuth.OnPageLoading(uri_netfx);

return true;

}

// For iOS 8 and older
public override bool OpenUrl(UIApplication application, NSUrl url, string sourceApplication, NSObject annotation)
{
Uri uri_netfx = new Uri(url.AbsoluteString);

// load redirect_url Page for parsing
FirebaseAuthService.XAuth.OnPageLoading(uri_netfx);

return true;
}
[/expand]
Con esto ya solo queda crear una vista y utilizar en el ViewModel el servicio implementado para tener la autenticación con Firebase completada.
- Base de datos de Firebase
Igual que para la autenticación lo primero es crear una interfaz del servicio, que será implementada en cada plataforma, y así se puede utilizar en el ViewModel.
 public interface IFirebaseDBService
    {
        void Connect();
        void GetMessage();
        void SetMessage(String message);
        string GetMessageKey();
        void DeleteItem(string key);
    }
Para trabajar con los datos solo hace falta implementar la interfaz en cada plataforma, crear una vista con su ViewMode y utilizar el servicio en este.
Android:
[expand title=»VER CÓDIGO»]
[assembly: Dependency(typeof(FirebaseDBService))]
namespace firebasesample.Droid.Services.FirebaseDB
{
public class ValueEventListener : Java.Lang.Object, IValueEventListener
{
public void OnCancelled(DatabaseError error) { }

public void OnDataChange(DataSnapshot snapshot) {
ObservableCollection list = new ObservableCollection();

foreach (DataSnapshot item in snapshot.Children.ToEnumerable())
{
list.Add(new Homework
{
Key = item.Key.ToString(),
HomeWork = item.Value.ToString()
});

}

MessagingCenter.Send(FirebaseDBService.KEY_MESSAGE, FirebaseDBService.KEY_MESSAGE, list);
}
}

public class FirebaseDBService : IFirebaseDBService
{
DatabaseReference databaseReference;
FirebaseDatabase database;
FirebaseAuthService authService = new FirebaseAuthService();
public static String KEY_MESSAGE = "items";

public void Connect()
{
database = FirebaseDatabase.GetInstance(MainActivity.app);
}

public void GetMessage()
{
var userId = authService.GetUserId();
databaseReference = database.GetReference("items/" + userId);
databaseReference.AddValueEventListener(new ValueEventListener());
}

public string GetMessageKey()
{
return KEY_MESSAGE;
}

public void SetMessage(string message)
{
var userId = authService.GetUserId();
databaseReference = database.GetReference("items/" + userId);

String key = databaseReference.Push().Key;

databaseReference.Child(key).SetValue(message);
}

public void DeleteItem(string key)
{
var userId = authService.GetUserId();
databaseReference = database.GetReference("items/" + userId);
databaseReference.Child(key).RemoveValue();
}
}
}
[/expand]
iOS:
[expand title=»VER CÓDIGO»]
[assembly: Dependency(typeof(FirebaseDBService))]
namespace firebasesample.iOS.Services.FirebaseDB
{
public class FirebaseDBService : IFirebaseDBService
{
public static String KEY_MESSAGE = "items";

private FirebaseAuthService authService = new FirebaseAuthService();
DatabaseReference databaseReference;

public void Connect()
{
databaseReference = Database.DefaultInstance.GetRootReference();
}

public void GetMessage()
{
var userId = authService.GetUserId();
var messages = databaseReference.GetChild("items").GetChild(userId);

nuint handleReference2 = messages.ObserveEvent(DataEventType.Value, (snapshot) =>
{
//var folderData = snapshot.GetValue();
// Do magic with the folder data
NSObject value = snapshot.GetValue();
ObservableCollection list = new ObservableCollection();
if (value is NSDictionary folderData)
{

foreach (var item in folderData)
{
list.Add(new Homework
{
Key = item.Key.ToString(),
HomeWork = item.Value.ToString()
});
}
}
MessagingCenter.Send(FirebaseDBService.KEY_MESSAGE, FirebaseDBService.KEY_MESSAGE, list);
});
}

public void SetMessage(String message)
{
var userId = authService.GetUserId();
var messages = databaseReference.GetChild("items").GetChild(userId).Reference;
var key = messages.GetChildByAutoId().Key;
messages.GetChild(key).SetValue((NSString)message);
}

public String GetMessageKey()
{
return KEY_MESSAGE;
}

public void DeleteItem(string key)
{
var userId = authService.GetUserId();
var messages = databaseReference.GetChild("items").GetChild(userId).Reference;
messages.GetChild(key).RemoveValue();
}
}
}
[/expand]
Conclusión:
Siguiendo una serie de pasos y utilizando Firebase se puede crear una APP que tenga autenticación y gestión de datos sin depender de una API. Pero hay que tener en cuenta cuando es posible utilizar Firebase y cuando no, ya que si el modelo de datos es complejo es mejor tener una API y una BBDD relacional.